Download Jakarta-Tomcat.You Will Get A Zip File Or Installation File.If It Is Zip File, Extract It & Copy It To Safe Place Where Ever You Want.(Recomended:Copy Inside The Program File).If It Is Installation File Install It.Always Try To Find The Zip File.It Is Easy To Use.
Now Setup Few More Environment Variables.
Right Click My Computer -> Go To Properties -> Select Advanced System Settings -> Click Environment Variables
Go to C: -> Program Files -> Java ->jdk1.7.0_05 -> lib & Copy The File Path
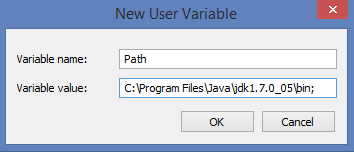
Create Another User Variable
Variable Name : ClassPath
Variable Value: C:\Program Files\Java\jdk1.7.0_05\lib
Go to C: -> Program Files -> Java ->jdk1.7.0_05 & Copy The File Path
Create Another User Variable
Variable Value : C:\Program Files\jakarta-tomcat-5.5.9\common\lib\servlet-api.jar
This Is All You Have Setup In Environment Variables Area.Now You Can Start The Jakartha Tomcat Server.Go To Tomcat Folder -> bin.You Will Find A Batch File Called 'startup'. Double Click It To Start The Server.If You Are Not Getting Any Errors That Mean Your Tomcat Setup Is Alright.You Will See The Starting Server As Below.


Go to C: -> Program Files -> Java ->jdk1.7.0_05 & Copy The File Path
Create Another User Variable
Variable Name : JAVA_HOME
Variable Value: C:\Program Files\Java\jdk1.7.0_05
Variable Value: C:\Program Files\Java\jdk1.7.0_05
Go To C:\Program Files\jakarta-tomcat-5.5.9\common\lib & Check Their Is Jar File Called 'servlet-api.jar'.If Not Check For That File In Tomcat.If You Are Unable To Find The File Download It & Copy It To C:\Program Files\jakarta-tomcat-5.5.9\common\lib Folder.You Have To Edit The Class Path.Click Edit & Enter Semicolon(;) After C:\Program Files\Java\jdk1.7.0_05\lib; Now Enter The Following
Variable Name : ClassPathVariable Value : C:\Program Files\jakarta-tomcat-5.5.9\common\lib\servlet-api.jar
This Is All You Have Setup In Environment Variables Area.Now You Can Start The Jakartha Tomcat Server.Go To Tomcat Folder -> bin.You Will Find A Batch File Called 'startup'. Double Click It To Start The Server.If You Are Not Getting Any Errors That Mean Your Tomcat Setup Is Alright.You Will See The Starting Server As Below.
Press Allow Access To Run It.And You Will See Your Tomcat Server Is Running.
Now Open A Browser To Check the Server.Type localhost:8080 & Hit Enter.8080 Is Server Port.Normally Server Port Is 8080.You Can Change Your Server Port If You Want.In My Case My Server Port Is 8085.After Entering The URL You Will Server The Tomcat Home Page As Below.
If Your Getting This Page, That Mean Your Server Is Working Fine.Now You Can Develop Java Server Side Program's.To Stop The Server Double Click The Bat File Called 'shutdown' In Bin Folder.