In This Article Ill Demonstrate You Guys To Integrate A SQL Server Data Source With Data Grid View In C# Using Step By Step. In This Article I Will Create A Windows Form Application To Integrate With SQL Server. First Of All Make Sure You Have Installed SQL Server.
So Lets Start Our Application By Opening The Visual Studio.
Step 01 : Click New Project And Select Windows > Windows Forms Application And Give A Project Name To It. Just Have A Look On Below Image, It Shows How I Did.
Now Press OK And Create The Project. Then Open The Toolbox. If Toolbox Not Visible Click View > Toolbox. Then Toolbox Window Will Open. Then Add A Data Grid View From Tool Box To The Form.
Now What We Need To Do Is We Should Connect The DataGridView With SQL Server Data Source. Follow The Below Steps Continue It.
Step 02 : Open Server Explorer.
Step 03 : Add A New Data Connection By Right Clicking The Data Connections Tab.
Step 04 : Select The Data Source As "Microsoft SQL Server (SqlClient)" And Select The Server Name. According To SQL Server, Select The Logging Either Windows Authentication Or SQL Server Authentication. Then Enter The Database Name. In My Example I Wanted My Database Name As "Bind Data To A GridView". If You Already Have A Database You Can Simply Select Your Database From Here. But Here I Will Create A New Database. Then Press OK.
Step 05 : If You Enter A Database Which Is Not Existing, It Will Open A Popup Like Below. Press Yes To Create It.
Step 06 : Then You Will Get The Server Explorer As Below. Right Click Tables And Add A New Table If You Created A New Database.
Step 07 : I Have Created The Table Called Employee With The Following Fields. Then Click Update Button.
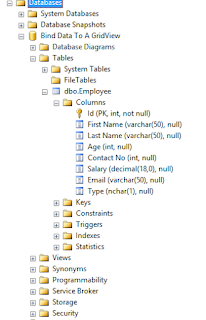
Step 08 : Go To SQL Server And Check The Database With The Table We Have Created.
Step 09 : Add Some Sample Data To The Table To Test The Data Source.
Step 10 : Add Data Source To The Data Grid View.
Step 11 : Select The Source Type As Database.
Step 12 : Choose The Database Model
Step 13 : Choose The Connection
Step 14 : Give A Name To The Connection
Step 15 : Select The Table And Columns You Want To Show.
Now You Will See The Data Grid As Below.
Now Run The Project And Check The Output.
Hope You Got The Basic Knowledge And Enjoyed.


No comments:
Post a Comment