Showing posts with label c#. Show all posts

Jan 29, 2019

C# Convert 24 hour format to 12 hour format in English and Arabic

I was writing a Web API to return a Time in both English and Arabic. My expectation was really simple. In my database table I had time as 24 hour format. So I wanted to return it in 12 hour format both in English and Arabic. Lets see what it looks like.

Start Time in 24 hour format(Database): 1130
End Time in 24 hour format(Database): 1430
12 hour format in English : 11:30 AM - 02:30 PM
12 hour format in Arabic:  م 02:30 - ص 11:30

To Convert to English is very straight forward.


1
2
3
4
5
6
7
private string Convert24To12HourInEnglish(string pStartTime, string pEndTime)
{
    DateTime startTime = new DateTime(2018, 1, 1, int.Parse(pStartTime.Substring(0, 2)), int.Parse(pStartTime.Substring(2, 2)), 0);
    DateTime endTime = new DateTime(2018, 1, 1, int.Parse(pEndTime.Substring(0, 2)), int.Parse(pEndTime.Substring(2, 2)), 0);

    return startTime.ToString("hh:mm tt") + " - " + endTime.ToString("hh:mm tt");
}


But when it comes to Arabic you need to format little. because when you add an Arabic text its automatically format to Right to Left(That's how Arabic language reads). 

We need to tell the string that we concatenate Left to Right using ((Char)0x200E).ToString()

Lets see how we can achieve that.

 1
 2
 3
 4
 5
 6
 7
 8
 9
10
11
12
13
private string Convert24To12HourInArabic(string pStartTime, string pEndTime)
{
    DateTime startTime = new DateTime(2018, 1, 1, int.Parse(pStartTime.Substring(0, 2)), int.Parse(pStartTime.Substring(2, 2)), 0);
    DateTime endTime = new DateTime(2018, 1, 1, int.Parse(pEndTime.Substring(0, 2)), int.Parse(pEndTime.Substring(2, 2)), 0);

    pStartTime = startTime.ToString("hh:mm tt");
    pEndTime = endTime.ToString("hh:mm tt");

    var lefttoright = ((Char)0x200E).ToString();
    string formattedText = (pEndTime.IndexOf("AM") > 0 ? "ص" : "م") + lefttoright + endTime.ToString("hh:mm") + " - " + (pStartTime.IndexOf("AM") > 0 ? "ص" : "م") + lefttoright + startTime.ToString("hh:mm");

    return formattedText;
}


That's it. now you have the two methods to Convert 24 Hour format time to 12 Hour format time in both English and Arabic.

Sep 28, 2016

[Fixed Solution] Show A Message When Mouse Hovers Over A Button In Windows Forms Application

In a windows forms application, sometimes you may wanted to show a mouse hover text on it, just like in web application. The easy way to do it is using a tool tip. 

In this blog post I'm going to show you a easy way of doing it. With just two lines of C# codes.  Simply you can do this using a MouseHover event. To do that click your button in designer mode and go to events in properties window. Now find the MouseHover event and double click in that. You will get the mouse hover event code. Simply use the below codes to show the text.


1
2
3
4
5
public void btnTest_MouseHover(object sender, EventArgs e)
{
 System.Windows.Forms.ToolTip toolTip = new System.Windows.Forms.ToolTip();
 toolTip.SetToolTip(btnTest, "This is a test text");
}

Dec 15, 2015

Use Optional Parameters For Methods In C#

In C# You Can Create Methods With Optional Parameters. Which Means, When You Are Calling The Method You Don't Need Pass All The Parameters. If You Want You Can Ignore The Optional Ones. Then Methods Will Take The Defaults Values. Important Thing In Optional Parameter Is, You Have To Give A Default Value To The Optional Parameters.

Lets See How We Can Do This. I Have Create A Simple Console Application. In That Create A Static Method Called "SayHello" Which Takes Two String Parameters As "First Name" And "Last Name".


 1
 2
 3
 4
 5
 6
 7
 8
 9
10
11
12
13
14
15
16
17
18
19
20
21
22
23
using System;
using System.Collections.Generic;
using System.Linq;
using System.Text;
using System.Threading.Tasks;

namespace Optional_Parameter
{
    class Program
    {
        static void Main(string[] args)
        {
            SayHello("Nifal", "Nizar");
            Console.ReadLine();
        }

        static void SayHello(string firstName, string lastName)
        {
            Console.WriteLine("Hello {0} {1}", firstName, lastName);
        }

    }
}

If You Run This You Will Get The Output In The Console As Below.

Hello Nifal Nizar

Lets Make The "Last Name" Parameter Optional. Simply In The Method Give A Default Value To The "Last Name" Parameter. In My Case I'm Giving Empty String To It. Lets See The Code.


 1
 2
 3
 4
 5
 6
 7
 8
 9
10
11
12
13
14
15
16
17
18
19
20
21
22
23
using System;
using System.Collections.Generic;
using System.Linq;
using System.Text;
using System.Threading.Tasks;

namespace Optional_Parameter
{
    class Program
    {
        static void Main(string[] args)
        {
            SayHello("Nifal");
            Console.ReadLine();
        }

        static void SayHello(string firstName, string lastName = "")
        {
            Console.WriteLine("Hello {0} {1}", firstName, lastName);
        }

    }
}

Now Run And See The Output.

Hello Nifal

Same Like This You Can Make More Optional Parameters. Hope You Got The Knowledge Of Optional Parameter.


Nov 28, 2015

Writing XML With The XmlWriter In C#

In This Article Ill Explain About The XML Writer In C#. Lets See First How Our Xml Going To Be.


 1
 2
 3
 4
 5
 6
 7
 8
 9
10
11
12
13
<?xml version="1.0" encoding="utf-8"?>
<Students>
   <Student>
      <FirstName>Nifal</FirstName>
      <LastName>Nizar</LastName>
      <Age>25</Age> 
   </Student>
   <Student>
      <FirstName>Dinesh</FirstName>
      <LastName>Selvachandra</LastName>
      <Age>24</Age>
   </Student>
</Students>

I Have Created A Simple Console Application.


 1
 2
 3
 4
 5
 6
 7
 8
 9
10
11
12
using System;

namespace XML_Writer
{
    class Program
    {
        static void Main(string[] args)
        {
            
        }
    }
}

In Order To Use "XmlWriter" We Need To Import The "System.Xml".
Lets Import And Start Using It.

Now Create An Object Of "XmlWriter" Class With The File Location As You Wish To Keep The Xml File. Its Better To Keep The Keep The File Path In A Variable. Normally In Large Systems It Comes From "Web.Config" File.


1
2
string xmlPath = "D:\\Students.xml";
using (XmlWriter xmlWriter = XmlWriter.Create(xmlPath))

Now Lets Start The Code To Write. First You Should Call The "WriteStartDocument()" Method To Start Writing. 


1
xmlWriter.WriteStartDocument();

According To Our Above Xml We Have Parent Node Call "Students". Then In Side That We Have Two Student Nodes.

To Create A Element Use The "WriteStartElement()" Method And Pass The String Parameter Into Which You Want To Be Your Element.


1
xmlWriter.WriteStartElement("Students");

To Create A Element String Use The "WriteElementString()" Method And Pass Two String Parameters Which Are Going To Be Your Element And Element Value.


1
xmlWriter.WriteElementString("FirstName", "Nifal");

When Your Writing Always Make Sure Your In The Correct Node Element And To Close All The Element Nodes. In Order To Close The Element Node Use The "WriteEndElement()" Method.


1
xmlWriter.WriteEndElement();

Finally Close The Document.


1
xmlWriter.WriteEndDocument();

Lets Have A Look On Full Code Now.


 1
 2
 3
 4
 5
 6
 7
 8
 9
10
11
12
13
14
15
16
17
18
19
20
21
22
23
24
25
26
27
28
29
30
31
32
33
34
35
using System;
using System.Xml;

namespace XML_Writer
{
  class Program
    {
      static void Main(string[] args)
      {
        string xmlPath = "D:\\Students.xml";
        using (XmlWriter xmlWriter = XmlWriter.Create(xmlPath))
        {
           xmlWriter.WriteStartDocument();

           xmlWriter.WriteStartElement("Students");

           xmlWriter.WriteStartElement("Student");
           xmlWriter.WriteElementString("FirstName", "Nifal");
           xmlWriter.WriteElementString("LastName", "Nizar");
           xmlWriter.WriteElementString("Age", "25");
           xmlWriter.WriteEndElement();

           xmlWriter.WriteStartElement("Student");
           xmlWriter.WriteElementString("FirstName", "Dinesh");
           xmlWriter.WriteElementString("LastName", "Selvachandra");
           xmlWriter.WriteElementString("Age", "24");
           xmlWriter.WriteEndElement();

           xmlWriter.WriteEndElement();

           xmlWriter.WriteEndDocument();
        }
      }
   }
}

Hope You Enjoyed It.


Oct 17, 2015

Bind Data Source To A DataGridView In Windows Form Application With Sql Server

In This Article Ill Demonstrate You Guys To Integrate A SQL Server Data Source With Data Grid View In C# Using Step By Step. In This Article I Will Create A Windows Form Application To Integrate With SQL Server. First Of All Make Sure You Have Installed SQL Server.

So Lets Start Our Application By Opening The Visual Studio. 

Step 01 : Click New Project And Select Windows > Windows Forms Application And Give A Project Name To It. Just Have A Look On Below Image, It Shows How I Did. 


Now Press OK And Create The Project. Then Open The Toolbox. If Toolbox Not Visible Click View > Toolbox. Then Toolbox Window Will Open. Then Add A Data Grid View From Tool Box To The Form.

Now What We Need To Do Is We Should Connect The DataGridView With SQL Server Data Source. Follow The Below Steps Continue It.

Step 02 : Open Server Explorer.


 Step 03 : Add A New Data Connection By Right Clicking The Data Connections Tab.


Step 04 : Select The Data Source As "Microsoft SQL Server (SqlClient)" And Select The Server Name. According To SQL Server, Select The Logging Either Windows Authentication Or SQL Server Authentication. Then Enter The Database Name. In My Example I Wanted My Database Name As "Bind Data To A GridView". If You Already Have A Database You Can Simply Select Your Database From Here. But Here I Will Create A New Database. Then Press OK.


Step 05 : If You Enter A Database Which Is Not Existing, It Will Open A Popup Like Below. Press Yes To Create It.


Step 06 : Then You Will Get The Server Explorer As Below. Right Click Tables And Add A New Table If You Created A New Database.


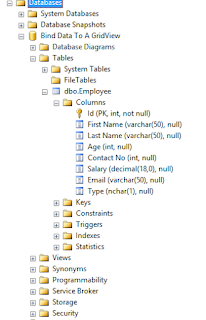
Step 07 : I Have Created The Table Called Employee With The Following Fields. Then Click Update Button.


Step 08 : Go To SQL Server And Check The Database With The Table We Have Created.


Step 09 : Add Some Sample Data To The Table To Test The Data Source.


Step 10 : Add Data Source To The Data Grid View.


Step 11 : Select The Source Type As Database.


Step 12 : Choose The Database Model


Step 13 : Choose The Connection


Step 14 : Give A Name To The Connection


Step 15 : Select The Table And Columns You Want To Show.


Now You Will See The Data Grid As Below.


Now Run The Project And Check The Output.


Hope You Got The Basic Knowledge And Enjoyed.


May 19, 2015

Access C# Method Using JQuery

In This Article I Will Explain You Guys About Accessing Method In C# From JQuery.
My Example Going To Be Very Simple. I Will Have Web Form To Enter A Name & Button Saying "Say Hello".
If You Click The Button Alert Should Come Saying "Hello <Name>".
First Of All Make Sure You Have Simple Idea About ASP.NET Web Sites, C# and JQuery.

Lets Get Into Works.


Create A New "ASP.NET Empty Web Site" & Add A New Web Form For That.

In My Case I have Created As Below.


Then Add A JQuery File To The Web Site.
Then Create The Text Field and Button As Below.

<%@ Page Language="C#" AutoEventWireup="true" CodeFile="Default.aspx.cs" Inherits="_Default" %>

<!DOCTYPE html>

<html xmlns="http://www.w3.org/1999/xhtml">
<head runat="server">
    <script src="jquery.js"></script>
</head>
<body>
    <form id="form1" runat="server">
        <div>
            <input type="text" id="txtName" />
            <br/>
            <input type="button" id="btnSayHello" value="Say Hello"/>
        </div>
    </form>
</body>
</html>

Now Lets Create The C# Method.
First Of All Before Sending A Parameter Lets Start With Simple Ajax Call.
Go To "Default.aspx.cs" File & Create Method As Below.

using System;
using System.Collections.Generic;
using System.Linq;
using System.Web;
using System.Web.Services;
using System.Web.UI;
using System.Web.UI.WebControls;

public partial class _Default : System.Web.UI.Page
{
    protected void Page_Load(object sender, EventArgs e)
    {

    }

    [WebMethod]
    public static string sayHello()
    {
        return "Hello Test";
    }

}

Try To Understand That, Say Hello Is Not Just A Simple Method In C#.It's A Web Method.
Now We Have Created The C# Method.Now What We Have To Do Is Call This Method Using AJAX.

In Order To Do That I'm Creating A Method In Java Script Section.
I Have  Added Script Tag Just Below The Head Tag & I Have Created Method Called "SayHello". Inside This Method I'm Calling The C# Method Using Ajax Call. 

<script>
        function sayHello() {
            $.ajax({
                type: "POST",
                url: "Default.aspx/sayHello",
                contentType: "application/json; charset=utf-8",
                dataType: "json",
                success: function (response) {
                    alert(response.d);
                },
                failure: function (response) {
                    alert(response.d);
                }
            });
        }

</script>

Run The Project And See.


Now Lets Call The Function With Entered Value.To Do This We Should Call The Ajax Function With JSON Parameter & Change Web Method To Access A Variable.Lets Finish This Off.


Default.aspx
<%@ Page Language="C#" AutoEventWireup="true" CodeFile="Default.aspx.cs" Inherits="_Default" %>

<!DOCTYPE html>

<html xmlns="http://www.w3.org/1999/xhtml">
<head runat="server">
    <script src="jquery.js"></script>
    <script>
        function sayHello() {
            var txtName = $("#txtName").val();
            $.ajax({
                type: "POST",
                url: "Default.aspx/sayHello",
                contentType: "application/json; charset=utf-8",
                dataType: "json",
                data: "{'Name':'" + txtName + "'}",
                success: function (response) {
                    alert(response.d);
                },
                failure: function (response) {
                    alert(response.d);
                }
            });
        }
    </script>

</head>
<body>
    <form id="form1" runat="server">
        <div>
            <input type="text" id="txtName" />
            <br />
            <input type="button" id="btnSayHello" value="Say Hello" onclick="sayHello()" />
        </div>
    </form>
</body>

</html>

Default.aspx.cs
using System;
using System.Collections.Generic;
using System.Linq;
using System.Web;
using System.Web.Services;
using System.Web.UI;
using System.Web.UI.WebControls;

public partial class _Default : System.Web.UI.Page
{
    protected void Page_Load(object sender, EventArgs e)
    {

    }

    [WebMethod]
    public static string sayHello(String Name)
    {
        return "Hello " + Name;
    }
}


May 23, 2014

Save You Errors In A Notepad C#

You Could Write It Any Where You Want .
You Could Write It Inside Every Function If You Need To.

I Have Used It Under A Button Click

protected void Button1_Click(object sender, EventArgs e)
        {
            TestClass t = new TestClass();
            DateTime time =  DateTime.Now;
            
            try
            {
                throw new Exception("Sql Error");

            }
            catch (Exception error)
            {
                TextBox1.Text = "" + error.Message;
                t.errorLogger(time.ToString(), "Your Function Name", ""+error.Message);                
            }
        }

 I Have Created A Class Name TestClass and created a object above and 
 called the function inside the class.

using System;
using System.Collections.Generic;
using System.Linq;
using System.Web;

namespace Error_Handling
{
    public class TestClass
    {
        public void errorLogger(string time,string functionName,string errorOccured)
        {
            string lines = "Time : " + time + "  | Function Name : " + functionName + "  | Error Occured : " + errorOccured;
            System.IO.StreamWriter file = new System.IO.StreamWriter("c:\\test.txt", true);
            file.WriteLine(lines);

            file.Close();
        }
    }
}

You will have to specify the path of the notepad above.

Apr 9, 2014

Customize DataGridView With A Code

This Code Can Use To Change The Design and Customize The DataGridView


private void SetUpDataGridView()
{
    this.Controls.Add(dataGridView1);
    dataGridView1.ColumnCount = 5;
    DataGridViewCellStyle style =
    dataGridView1.ColumnHeadersDefaultCellStyle;
    style.BackColor = Color.Navy;
    style.ForeColor = Color.White;
    style.Font = new Font(dataGridView1.Font, FontStyle.Bold);

    dataGridView1.EditMode = DataGridViewEditMode.EditOnEnter;
    dataGridView1.Name = "dataGridView1";
    dataGridView1.Location = new Point(8, 8);
    dataGridView1.Size = new Size(500, 300);
    dataGridView1.AutoSizeRowsMode =
                           DataGridViewAutoSizeRowsMode.DisplayedCellsExceptHeaders;
    dataGridView1.ColumnHeadersBorderStyle =
                           DataGridViewHeaderBorderStyle.Raised;
    dataGridView1.CellBorderStyle = DataGridViewCellBorderStyle.Single;
    dataGridView1.GridColor = SystemColors.ActiveBorder;
    dataGridView1.RowHeadersVisible = false;

    dataGridView1.Columns[0].Name = "Release Date";
    dataGridView1.Columns[1].Name = "Track";
    dataGridView1.Columns[1].DefaultCellStyle.Alignment =
                            DataGridViewContentAlignment.MiddleCenter;
    dataGridView1.Columns[2].Name = "Title";
    dataGridView1.Columns[3].Name = "Artist";
    dataGridView1.Columns[4].Name = "Album";

    // Make the font italic for row four.
    dataGridView1.Columns[4].DefaultCellStyle.Font = new Font(DataGridView.DefaultFont,  FontStyle.Italic);

    dataGridView1.SelectionMode = DataGridViewSelectionMode.FullRowSelect;
    dataGridView1.MultiSelect = false;

    dataGridView1.BackgroundColor = Color.Honeydew;

    dataGridView1.Dock = DockStyle.Fill;

    dataGridView1.CellFormatting += new   DataGridViewCellFormattingEventHandler(dataGridView1_CellFormatting);
    dataGridView1.CellParsing += new DataGridViewCellParsingEventHandler(dataGridView1_CellParsing);
    addNewRowButton.Click += new EventHandler(addNewRowButton_Click);
    deleteRowButton.Click += new EventHandler(deleteRowButton_Click);
    ledgerStyleButton.Click += new EventHandler(ledgerStyleButton_Click);
    dataGridView1.CellValidating += new DataGridViewCellValidatingEventHandler(dataGridView1_CellValidating);

}


Feb 19, 2014

Get The English Text For A Number

This Example Shows How To Get The English Text For A Number.This Can Be Used To Convert A Numeric Currency To English Sentence. 
By Passing A Number To This Method You Can Get The Text For The Number You Passed

public static string ConvertMoneyToText(string value)//---Convert Currency To Word---
{
    value = value.Replace(",", "").Replace("$", "");
    int decimalCount = 0;
    int Val = value.Length - 1;
    for (int x = 0; x <= Val; x++)
    {
         char Val2 = value[x];
         if (Val2.ToString() == ".")
         {
              decimalCount++;
              if (decimalCount > 1)
              {
                   throw new ArgumentException("Only monetary values are accepted");
              }
         }
         Val2 = value[x];
         char Valtemp = value[x];
         if (!(char.IsDigit(value[x]) | (Val2.ToString() == ".")) & !((x == 0) & (Valtemp.ToString() == "-")))
                {
                    throw new ArgumentException("Only monetary values are accepted");
                }
            }
            string returnValue = "";
            string[] parts;
            if (value.Contains("."))
                parts = value.Split(new char[] { '.' });
            else
                parts = (value + ".00").Split(new char[] { '.' });

            parts[1] = new string((parts[1] + "00").Substring(0, 2).ToCharArray());
            bool IsNegative = parts[0].Contains("-");
            if (parts[0].Replace("-", "").Length > 0x12)
            {
                throw new ArgumentException("Maximum value is $999,999,999,999,999,999.99");
            }
            if (IsNegative)
            {
                parts[0] = parts[0].Replace("-", "");
                returnValue = returnValue + "Minus ";
            }

            if (parts[0].Length > 15)
            {
                returnValue = returnValue + HundredsText(parts[0].PadLeft(0x12, '0').Substring(0, 3)) + "Quadrillion ";
                if (parts[0].PadLeft(0x12, '0').Substring(3, 3) != "000")
                {
                    returnValue = returnValue + HundredsText(parts[0].PadLeft(0x12, '0').Substring(3, 3)) + "Trillion ";
                }
                if (parts[0].PadLeft(0x12, '0').Substring(6, 3) != "000")
                {
                    returnValue = returnValue + HundredsText(parts[0].PadLeft(0x12, '0').Substring(6, 3)) + "Billion ";
                }
                if (parts[0].PadLeft(0x12, '0').Substring(9, 3) != "000")
                {
                    returnValue = returnValue + HundredsText(parts[0].PadLeft(0x12, '0').Substring(9, 3)) + "Million ";
                }
                if (parts[0].PadLeft(0x12, '0').Substring(12, 3) != "000")
                {
                    returnValue = returnValue + HundredsText(parts[0].PadLeft(0x12, '0').Substring(12, 3)) + "Thousand ";
                }
            }
            else if (parts[0].Length > 12)
            {
                returnValue = returnValue + HundredsText(parts[0].PadLeft(15, '0').Substring(0, 3)) + "Trillion ";
                if (parts[0].PadLeft(15, '0').Substring(3, 3) != "000")
                {
                    returnValue = returnValue + HundredsText(parts[0].PadLeft(15, '0').Substring(3, 3)) + "Billion ";
                }
                if (parts[0].PadLeft(15, '0').Substring(6, 3) != "000")
                {
                    returnValue = returnValue + HundredsText(parts[0].PadLeft(15, '0').Substring(6, 3)) + "Million ";
                }
                if (parts[0].PadLeft(15, '0').Substring(9, 3) != "000")
                {
                    returnValue = returnValue + HundredsText(parts[0].PadLeft(15, '0').Substring(9, 3)) + "Thousand ";
                }
            }
            else if (parts[0].Length > 9)
            {
                returnValue = returnValue + HundredsText(parts[0].PadLeft(12, '0').Substring(0, 3)) + "Billion ";
                if (parts[0].PadLeft(12, '0').Substring(3, 3) != "000")
                {
                    returnValue = returnValue + HundredsText(parts[0].PadLeft(12, '0').Substring(3, 3)) + "Million ";
                }
                if (parts[0].PadLeft(12, '0').Substring(3, 3) != "000")
                {
                    returnValue = returnValue + HundredsText(parts[0].PadLeft(12, '0').Substring(6, 3)) + "Thousand ";
                }
            }
            else if (parts[0].Length > 6)
            {
                returnValue = returnValue + HundredsText(parts[0].PadLeft(9, '0').Substring(0, 3)) + "Million ";
                if (parts[0].PadLeft(9, '0').Substring(0, 3) != "000")
                {
                    returnValue = returnValue + HundredsText(parts[0].PadLeft(9, '0').Substring(3, 3)) + "Thousand ";
                }
            }
            else if (parts[0].Length > 3)
            {
                returnValue = returnValue + HundredsText(parts[0].PadLeft(6, '0').Substring(0, 3)) + "Thousand ";
            }

            string hundreds = parts[0].PadLeft(3, '0');
            int tempInt = 0;
            hundreds = hundreds.Substring(hundreds.Length - 3, 3);
            if (int.TryParse(hundreds, out tempInt) == true)
            {
                returnValue = returnValue + HundredsText(hundreds) + "Rupee";
                if (int.Parse(hundreds) != 1)
                {
                    returnValue = returnValue + "s";
                }
                if (int.Parse(parts[1]) != 0)
                {
                    returnValue = returnValue + " and ";
                }
            }
            if ((parts.Length == 2) && (int.Parse(parts[1]) != 0))
            {
                returnValue = returnValue + HundredsText(parts[1].PadLeft(3, '0')) + "Cent";
                if (int.Parse(parts[1]) != 1)
                {
                    returnValue = returnValue + "s";
                }
            }
            return returnValue;
        }

        private static string HundredsText(string value)
        {
            char Val_1;
            char Val_2;
            string returnValue = "";
            bool IsSingleDigit = true;
            char Val = value[0];
            if (int.Parse(Val.ToString()) != 0)
            {
                Val_1 = value[0];
                returnValue = returnValue + Ones[int.Parse(Val_1.ToString()) - 1] + " Hundred ";
                IsSingleDigit = false;
            }
            Val_1 = value[1];
            if (int.Parse(Val_1.ToString()) > 1)
            {
                Val = value[1];
                returnValue = returnValue + Tens[int.Parse(Val.ToString()) - 1] + " ";
                Val_1 = value[2];
                if (int.Parse(Val_1.ToString()) != 0)
                {
                    Val = value[2];
                    returnValue = returnValue + Ones[int.Parse(Val.ToString()) - 1] + " ";
                }
                return returnValue;
            }
            Val_1 = value[1];
            if (int.Parse(Val_1.ToString()) == 1)
            {
                Val = value[1];
                Val_2 = value[2];
                return (returnValue + Ones[int.Parse(Val.ToString() + Val_2.ToString()) - 1] + " ");
            }
            Val_2 = value[2];
            if (int.Parse(Val_2.ToString()) == 0)
            {
                return returnValue;
            }
            if (!IsSingleDigit)
            {
                returnValue = returnValue + "and ";
            }
            Val_2 = value[2];
            return (returnValue + Ones[int.Parse(Val_2.ToString()) - 1] + " ");
        }

        static string[] Tens = new string[] {
   "Ten",
   "Twenty",
   "Thirty",
   "Forty",
   "Fifty",
   "Sixty",
   "Seventy",
   "Eighty",
   "Ninety" };

        static string[] Ones = new string[] {
   "One",
   "Two",
   "Three",
   "Four",
   "Five",
   "Six",
   "Seven",
   "Eight",
   "Nine",
   "Ten",
   "Eleven",
   "Twelve",
   "Thirteen",
   "Fourteen",
   "Fifteen",
   "Sixteen",
   "Seventeen",
   "Eighteen",
   "Nineteen"};  

JWT Token Decode Using Jquery

When it come to authentication we use many mechanism. Ones the user authenticated we must keep these details somewhere safe. So we can share...