In This Example I'm Trying To Explain Pre-Increment , Post-Increment , Operators and How They Behave.
Following "JavaOpeartors.java" File Shows The Outputs.
class JavaOpeartors {
public static void main(String args[]){
int No1 = 10;
System.out.print("Initial No1 : ");
System.out.println(No1);
++No1;
System.out.print("Pre Increment ++No1 : ");
System.out.println(No1);
System.out.print("Post Increment No1++ : ");
System.out.println(No1++);
System.out.print("After Post Increment No1 : ");
System.out.println(No1);
No1 = No1 + 3;
System.out.print("No1 + 3 : ");
System.out.println(No1);
No1 += 10;
System.out.print("No1 += 10 : ");
System.out.println(No1);
No1 -= 5;
System.out.print("No1 -= 5 : ");
System.out.println(No1);
No1 *= 2;
System.out.print("No1 *= 2 : ");
System.out.println(No1);
}
}
OutPut
Initial No1 : 10
Pre Increment ++No1 : 11
Post Increment No1++ : 11
After Post Increment No1 : 12
No1 + 3 : 15
No1 += 10 : 25
No1 -= 5 : 20
No1 *= 2 : 40
Jul 17, 2014

Jul 6, 2014
Java Simple Command Line Calculator With Math Operators
In This Example We Are Trying To Create A Simple Calculator That Works With User Inputs In Command Line.Open Text File & Save As "CmdCalculator".Create The Class and Main Method Inside It.Import The Scanner Class.
Create A Scanner Object To Get The User Inputs.
Create Two Double Variables To Save Two Inputs.
Create Another Variable To Save The Answer.
import java.util.Scanner;
class CmdCalculator {
public static void main(String args[]){
Scanner MyScanner = new Scanner(System.in);
double No1,No2,Answer;
}
}
Now We Need Is Get The User Input and Do The Calculation and Print The Outputs.In The Command Prompt Use Scanner.nextDouble Method To Get The User Inputs as double Variable Rather Than Text..Complete The Coding.
import java.util.Scanner;
class CmdCalculator {
public static void main(String args[]){
Scanner MyScanner = new Scanner(System.in);
double No1,No2,Answer;
System.out.print("Enter The No1 : ");
No1 = MyScanner.nextDouble();
System.out.print("Enter The No2 : ");
No2 = MyScanner.nextDouble();
Answer = No1 + No2;
System.out.println("Addition Is : ");
System.out.print(Answer);
Answer = No1 - No2;
System.out.println("Subtraction Is : ");
System.out.print(Answer);
Answer = No1 / No2;
System.out.println("Division Is : ");
System.out.print(Answer);
Answer = No1 * No2;
System.out.println("Multiplication Is : ");
System.out.print(Answer);
}
}
Now Run The Program.It Will First Ask Two User Input As No1 and No2.You Will Get Following Outputs At The End.
Enter The No1 : 12
Enter The No2 : 4
Addition Is : 16
Subtraction Is : 8
Division Is : 3
Multiplication Is : 48
Create A Scanner Object To Get The User Inputs.
Create Two Double Variables To Save Two Inputs.
Create Another Variable To Save The Answer.
import java.util.Scanner;
class CmdCalculator {
public static void main(String args[]){
Scanner MyScanner = new Scanner(System.in);
double No1,No2,Answer;
}
}
Now We Need Is Get The User Input and Do The Calculation and Print The Outputs.In The Command Prompt Use Scanner.nextDouble Method To Get The User Inputs as double Variable Rather Than Text..Complete The Coding.
import java.util.Scanner;
class CmdCalculator {
public static void main(String args[]){
Scanner MyScanner = new Scanner(System.in);
double No1,No2,Answer;
System.out.print("Enter The No1 : ");
No1 = MyScanner.nextDouble();
System.out.print("Enter The No2 : ");
No2 = MyScanner.nextDouble();
Answer = No1 + No2;
System.out.println("Addition Is : ");
System.out.print(Answer);
Answer = No1 - No2;
System.out.println("Subtraction Is : ");
System.out.print(Answer);
Answer = No1 / No2;
System.out.println("Division Is : ");
System.out.print(Answer);
Answer = No1 * No2;
System.out.println("Multiplication Is : ");
System.out.print(Answer);
}
}
Now Run The Program.It Will First Ask Two User Input As No1 and No2.You Will Get Following Outputs At The End.
Enter The No1 : 12
Enter The No2 : 4
Addition Is : 16
Subtraction Is : 8
Division Is : 3
Multiplication Is : 48
Java Getting User Inputs
In This Example We Are Trying To Get User Inputs and Print It.
Open Text File & Save As SayHello.Create The Class and Main Method Inside It.Inside The Method Print A Text Line Asking User To Input The Name.
class SayHello {
public static void main(String args[]){
System.out.print("Enter The Name : ");
}
}
To Get The User Inputs We Need A Scanner Object.But By Default Scanner Class Is Not Available Us To Create A Scanner Object.You Need To Import The Scanner Class First.After That You Can Use The Scanner Class.Create A String Variable To Save The Name and Create A Scanner Object To Get The User Inputs.
import java.util.Scanner;
class SayHello {
public static void main(String args[]){
Scanner MyScanner = new Scanner(System.in);
String Name;
System.out.print("Enter The Name : ");
}
}
Now We Need Is Get The User Input and Print It Again In The Command Prompt.Use Scanner.in Method To Get The User Inputs.Complete The Coding.
import java.util.Scanner;
class SayHello {
public static void main(String args[]){
Scanner MyScanner = new Scanner(System.in);
String Name;
System.out.print("Enter The Name : ");
Name = MyScanner.nextLine();
System.out.print("Hello ");
System.out.print(Name);
}
}
Now Run The Program.It Will First Print "Enter The Name : " and Wait For User Input.Type The Name and Press Enter Button To See The Output.You Will Get Following Outputs At The End.
Enter The Name : Nifal
Hello Nifal
Open Text File & Save As SayHello.Create The Class and Main Method Inside It.Inside The Method Print A Text Line Asking User To Input The Name.
class SayHello {
public static void main(String args[]){
System.out.print("Enter The Name : ");
}
}
To Get The User Inputs We Need A Scanner Object.But By Default Scanner Class Is Not Available Us To Create A Scanner Object.You Need To Import The Scanner Class First.After That You Can Use The Scanner Class.Create A String Variable To Save The Name and Create A Scanner Object To Get The User Inputs.
import java.util.Scanner;
class SayHello {
public static void main(String args[]){
Scanner MyScanner = new Scanner(System.in);
String Name;
System.out.print("Enter The Name : ");
}
}
Now We Need Is Get The User Input and Print It Again In The Command Prompt.Use Scanner.in Method To Get The User Inputs.Complete The Coding.
import java.util.Scanner;
class SayHello {
public static void main(String args[]){
Scanner MyScanner = new Scanner(System.in);
String Name;
System.out.print("Enter The Name : ");
Name = MyScanner.nextLine();
System.out.print("Hello ");
System.out.print(Name);
}
}
Now Run The Program.It Will First Print "Enter The Name : " and Wait For User Input.Type The Name and Press Enter Button To See The Output.You Will Get Following Outputs At The End.
Enter The Name : Nifal
Hello Nifal
Java Variables and Printing Values
Open Text File & Save As JavaVariables.Create The Class and Main Method Inside It.
class HelloWorld {
public static void main(String args[]){
}
}
Now We Have Our JavaVariables Class. Inside The Class We Can Create Our Variables.I'm Creating Variables All Together And Printing All.
class HelloWorld {
public static void main(String args[]){
String SName = "Nifal Nizar";
int age = 24;
System.out.print("My Name Is ");
System.out.println(SName);
System.out.print("I am ");
System.out.print(age);
}
}
You Will See The Out Put As
My Name Is Nifal Nizar
I am 24
If We Are Using print Method It Will Print The Text And Wait In The Same Line.But If We Use println Method It Will Print The Text and It Will Go To Next Line.
class HelloWorld {
public static void main(String args[]){
}
}
Now We Have Our JavaVariables Class. Inside The Class We Can Create Our Variables.I'm Creating Variables All Together And Printing All.
class HelloWorld {
public static void main(String args[]){
String SName = "Nifal Nizar";
int age = 24;
System.out.print("My Name Is ");
System.out.println(SName);
System.out.print("I am ");
System.out.print(age);
}
}
You Will See The Out Put As
My Name Is Nifal Nizar
I am 24
If We Are Using print Method It Will Print The Text And Wait In The Same Line.But If We Use println Method It Will Print The Text and It Will Go To Next Line.
Java Hello World
To Start Java Development You Must First Setup The Environment For It.If You Are Not Setup The Environment Yet Click Here.
After Setting Up The Java Development Environment, We Can Run Our First Java Application. In order To Do That i'm Using Notepad++ Text Editor. As Beginner Its Good To Code In The Notepad++.
As Good Practice Create A Folder & Name It As Java-codes. Inside The Folder Open Text File. Inside The Text File We Can Write Our Java Codes. First Of All We Have To Create A Class.We Can Give Any Name To Java Class. But Make Sure You Have Given A Meaningful Name.In My Case I'm Calling My Class As HelloWorld.
class HelloWorld {
}
Now We Have Our Class.Still We Don't Have A Java File.To Make This Text File To A Java File Save This File As "HelloWorld.java".Now We Have Our File.Now We Need The Main Method.Create The Main Method Inside The Class.
class HelloWorld {
public static void main(String args[]){
}
}
Now We Have Our Main Method.Now We Just Need Is To Print Hello World In The Command Prompt.In Java Its Provide Method Call Print To Print Stuff.Type The Following Complete The Code To Print Hello World.
class HelloWorld {
public static void main(String args[]){
System.out.print("Hello World");
}
}
Now Save The File.Open Command Prompt.Go To File Location That We Created First In The Command Prompt.In My Case Its In The "D" Drive.First We Have To Complie Our Java File & We Have To Take The Class File.In Order To Do That Type Javac HelloWorld.java , and Press Enter.Now You Will See The Class File Inside The Folder.Now Run The Class File & Check For The Output.
java HelloWorld

After Setting Up The Java Development Environment, We Can Run Our First Java Application. In order To Do That i'm Using Notepad++ Text Editor. As Beginner Its Good To Code In The Notepad++.
As Good Practice Create A Folder & Name It As Java-codes. Inside The Folder Open Text File. Inside The Text File We Can Write Our Java Codes. First Of All We Have To Create A Class.We Can Give Any Name To Java Class. But Make Sure You Have Given A Meaningful Name.In My Case I'm Calling My Class As HelloWorld.
class HelloWorld {
}
Now We Have Our Class.Still We Don't Have A Java File.To Make This Text File To A Java File Save This File As "HelloWorld.java".Now We Have Our File.Now We Need The Main Method.Create The Main Method Inside The Class.
class HelloWorld {
public static void main(String args[]){
}
}
Now We Have Our Main Method.Now We Just Need Is To Print Hello World In The Command Prompt.In Java Its Provide Method Call Print To Print Stuff.Type The Following Complete The Code To Print Hello World.
class HelloWorld {
public static void main(String args[]){
System.out.print("Hello World");
}
}
Now Save The File.Open Command Prompt.Go To File Location That We Created First In The Command Prompt.In My Case Its In The "D" Drive.First We Have To Complie Our Java File & We Have To Take The Class File.In Order To Do That Type Javac HelloWorld.java , and Press Enter.Now You Will See The Class File Inside The Folder.Now Run The Class File & Check For The Output.
java HelloWorld
Jun 25, 2014
Setting Development Environment For Java Server Side Development
In Order To Develop Server Side Java Program Like JSP and Servlet You Must Have A Server Like Tomcat To Run The Application.And You Have May Also Have To Setup Few More Environment Variables Other That 'Path'. First Of All Setup Environment For Java Development.If You Have Not Setup Click Here.
Download Jakarta-Tomcat.You Will Get A Zip File Or Installation File.If It Is Zip File, Extract It & Copy It To Safe Place Where Ever You Want.(Recomended:Copy Inside The Program File).If It Is Installation File Install It.Always Try To Find The Zip File.It Is Easy To Use.
Now Setup Few More Environment Variables.
Right Click My Computer -> Go To Properties -> Select Advanced System Settings -> Click Environment Variables
Go to C: -> Program Files -> Java ->jdk1.7.0_05 -> lib & Copy The File Path
Create Another User Variable
Variable Name : ClassPath
Download Jakarta-Tomcat.You Will Get A Zip File Or Installation File.If It Is Zip File, Extract It & Copy It To Safe Place Where Ever You Want.(Recomended:Copy Inside The Program File).If It Is Installation File Install It.Always Try To Find The Zip File.It Is Easy To Use.
Now Setup Few More Environment Variables.
Right Click My Computer -> Go To Properties -> Select Advanced System Settings -> Click Environment Variables
Go to C: -> Program Files -> Java ->jdk1.7.0_05 -> lib & Copy The File Path
Create Another User Variable
Variable Name : ClassPath
Variable Value: C:\Program Files\Java\jdk1.7.0_05\lib
Go to C: -> Program Files -> Java ->jdk1.7.0_05 & Copy The File Path
Create Another User Variable
Variable Value : C:\Program Files\jakarta-tomcat-5.5.9\common\lib\servlet-api.jar
This Is All You Have Setup In Environment Variables Area.Now You Can Start The Jakartha Tomcat Server.Go To Tomcat Folder -> bin.You Will Find A Batch File Called 'startup'. Double Click It To Start The Server.If You Are Not Getting Any Errors That Mean Your Tomcat Setup Is Alright.You Will See The Starting Server As Below.


Go to C: -> Program Files -> Java ->jdk1.7.0_05 & Copy The File Path
Create Another User Variable
Variable Name : JAVA_HOME
Variable Value: C:\Program Files\Java\jdk1.7.0_05
Variable Value: C:\Program Files\Java\jdk1.7.0_05
Go To C:\Program Files\jakarta-tomcat-5.5.9\common\lib & Check Their Is Jar File Called 'servlet-api.jar'.If Not Check For That File In Tomcat.If You Are Unable To Find The File Download It & Copy It To C:\Program Files\jakarta-tomcat-5.5.9\common\lib Folder.You Have To Edit The Class Path.Click Edit & Enter Semicolon(;) After C:\Program Files\Java\jdk1.7.0_05\lib; Now Enter The Following
Variable Name : ClassPathVariable Value : C:\Program Files\jakarta-tomcat-5.5.9\common\lib\servlet-api.jar
This Is All You Have Setup In Environment Variables Area.Now You Can Start The Jakartha Tomcat Server.Go To Tomcat Folder -> bin.You Will Find A Batch File Called 'startup'. Double Click It To Start The Server.If You Are Not Getting Any Errors That Mean Your Tomcat Setup Is Alright.You Will See The Starting Server As Below.
Press Allow Access To Run It.And You Will See Your Tomcat Server Is Running.
Now Open A Browser To Check the Server.Type localhost:8080 & Hit Enter.8080 Is Server Port.Normally Server Port Is 8080.You Can Change Your Server Port If You Want.In My Case My Server Port Is 8085.After Entering The URL You Will Server The Tomcat Home Page As Below.
If Your Getting This Page, That Mean Your Server Is Working Fine.Now You Can Develop Java Server Side Program's.To Stop The Server Double Click The Bat File Called 'shutdown' In Bin Folder.
Setting Development Environment For Java Development
In This I'm Going To Describe How To Setup Environment For Java Development and Writing A Simple Hello World Program.
First Of All Check Weather You Have Already Setup Java Development Environment In Your Machine.In Order To Find Out Open Command Prompt(cmd) & Type 'javac'.If You Seen Something Like Below, That Mean You Have Not Setup The Environment For Java Development.

If Not, You Must Download Java Development Kit(jdk).Open Up Browser & Type Download Jdk, It Will Show Many Links & Go To Oracle Site Download The Jdk & Install It.This Installation Is Not Hard, Its A Simple Installation.By Only Installing Java Development Kit(jdk) You Cannot Start Developing Java Applications.You Must Setup The Java Environment.
To Create New Environment Variables



If Your Getting Your Command Prompt Like Above, That Mean You Have Successfully Setup The Environment For Java Development.If Not You Have To Check The Jdk Installation & Environment Setup Again.
First Of All Check Weather You Have Already Setup Java Development Environment In Your Machine.In Order To Find Out Open Command Prompt(cmd) & Type 'javac'.If You Seen Something Like Below, That Mean You Have Not Setup The Environment For Java Development.
If Not, You Must Download Java Development Kit(jdk).Open Up Browser & Type Download Jdk, It Will Show Many Links & Go To Oracle Site Download The Jdk & Install It.This Installation Is Not Hard, Its A Simple Installation.By Only Installing Java Development Kit(jdk) You Cannot Start Developing Java Applications.You Must Setup The Java Environment.
To Create New Environment Variables
- Go To C: -> Program Files -> Java -> jdk1.7.0_05 -> bin & Copy The File Path
- Right Click My Computer & Go To Properties
- Select Advanced System Settings
- Click Environment Variables
- Click New In User Variables Section
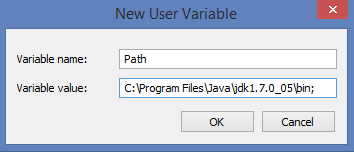
- Enter The Following To Create A Path Environment Variable For Jdk bin.
Variable Name : Path
Variable Value: C:\Program Files\Java\ jdk1.7.0_05\bin
- Click OK In Every Window & Close Everything.
- Now Open Command Prompt & Type 'javac'.You WIll Get A Your Command Prompt Like Below.
If Your Getting Your Command Prompt Like Above, That Mean You Have Successfully Setup The Environment For Java Development.If Not You Have To Check The Jdk Installation & Environment Setup Again.
Jun 12, 2014
Android Backgound Processing Service
This Example Show How To Use Services In Android.Our Main Task In This Example Is Start A Service and End A Service.A Service Is A Component That Runs In The Background To Perform Long-Running Operations Without Any Interact With The User.
First Of All We Need To Create A New Android Application Project.In My Case I'm Calling My Application As 'BackgroundService'.The Start up Window Appear As Below.

After Creating The Application We Have To Design Our Layout With Two Buttons.In My Case Im Calling My Buttons As 'Start Service' & 'End Service'.In Order To Do That Open The 'activity_main.xml' File.Replace The File With Following Codes.

Change Manifest To Identify The Service.Add Following Code In AndroidManifest File In Between "</activity>" & "</application>" Tags As Follows.
<?xml version="1.0" encoding="utf-8"?>
<manifest xmlns:android="http://schemas.android.com/apk/res/android"
package="com.example.backgroundprocess"
android:versionCode="1"
android:versionName="1.0" >
<uses-sdk
android:minSdkVersion="9"
android:targetSdkVersion="9" />
<application
android:allowBackup="true"
android:icon="@drawable/ic_launcher"
android:label="@string/app_name"
android:theme="@style/AppTheme" >
<activity
android:name="com.example.backgroundprocess.MainActivity"
android:label="@string/app_name" >
<intent-filter>
<action android:name="android.intent.action.MAIN" />
<category android:name="android.intent.category.LAUNCHER" />
</intent-filter>
</activity>
<service android:name=".MyService" />
</application>
</manifest>
Now We Have Completed Our Coding Parts.Now Run The Application & See.After Clicking 'Start Service' You Will Get The Out Put As Below.

Now Press The 'Stop Service' Button.You Will Get The Following Output.

Now You Can Use This Is Simple Application As A Component To Your Application.
For Your Knowledge : You Can Start A Services Many Time Without Even Stopping It.But You Can Only Stop A Service If Their Is A Running Service Only.
First Of All We Need To Create A New Android Application Project.In My Case I'm Calling My Application As 'BackgroundService'.The Start up Window Appear As Below.
After Creating The Application We Have To Design Our Layout With Two Buttons.In My Case Im Calling My Buttons As 'Start Service' & 'End Service'.In Order To Do That Open The 'activity_main.xml' File.Replace The File With Following Codes.
<LinearLayout xmlns:android="http://schemas.android.com/apk/res/android"
android:layout_width="fill_parent"
android:layout_height="fill_parent"
android:orientation="vertical" >
<Button android:id="@+id/btnStartService"
android:layout_width="fill_parent"
android:layout_height="wrap_content"
android:text="@string/start_service"
android:onClick="startService"/>
<Button android:id="@+id/btnStopService"
android:layout_width="fill_parent"
android:layout_height="wrap_content"
android:text="@string/stop_service"
android:onClick="stopService" />
</LinearLayout>
android:layout_width="fill_parent"
android:layout_height="fill_parent"
android:orientation="vertical" >
<Button android:id="@+id/btnStartService"
android:layout_width="fill_parent"
android:layout_height="wrap_content"
android:text="@string/start_service"
android:onClick="startService"/>
<Button android:id="@+id/btnStopService"
android:layout_width="fill_parent"
android:layout_height="wrap_content"
android:text="@string/stop_service"
android:onClick="stopService" />
</LinearLayout>
After Adding This Codes You Will Get Few Errors.Don't Worry About It.Errors Are Coming Because Because We Didn't Add The Strings to strings.xml File.In Order To Do That Go To res --> values --> strings.xml And Add The Two Strings As Follows.
<resources>
<string name="app_name">HelloWorld</string>
<string name="hello_world">Hello world!</string>
<string name="menu_settings">Settings</string>
<string name="title_activity_main">MainActivity</string>
<string name="start_service">Start Service</string>
<string name="stop_service">Stop Service</string>
</resources>
Now We Have Our Layout and We Need To Create Service Class.In Order To Create Service Class Right Click The 'src' Folder & Go To New --> Class.It Will Open You A New Window To Create A New Class.Give The Class Name,Make The Class As Public Too.In My Case I'm Calling My Service Class As 'MyService'.
package com.example.backgroundprocess;
import android.app.Service;
import android.content.Intent;
import android.os.IBinder;
import android.widget.Toast;
public class MyService extends Service {
@Override
public IBinder onBind(Intent arg0) {
return null;
}
@Override
public int onStartCommand(Intent intent, int flags, int startId) {
// Let it continue running until it is stopped.
Toast.makeText(this, "Service Started", Toast.LENGTH_LONG).show();
return START_STICKY;
}
@Override
public void onDestroy() {
super.onDestroy();
Toast.makeText(this, "Service Destroyed", Toast.LENGTH_LONG).show();
}
}
Now We Have To Call This Service To Start.In Order To Do That We Have To Add Few Code Lines To 'MainActivity.java'.
package com.example.backgroundprocess;
import android.support.v7.app.ActionBarActivity;
import android.support.v7.app.ActionBar;
import android.support.v4.app.Fragment;
import android.content.Intent;
import android.os.Bundle;
import android.view.LayoutInflater;
import android.view.Menu;
import android.view.MenuItem;
import android.view.View;
import android.view.ViewGroup;
import android.os.Build;
public class MainActivity extends ActionBarActivity {
@Override
protected void onCreate(Bundle savedInstanceState) {
super.onCreate(savedInstanceState);
setContentView(R.layout.activity_main);
}
@Override
public boolean onCreateOptionsMenu(Menu menu) {
// Inflate the menu; this adds items to the action bar if it is present.
getMenuInflater().inflate(R.menu.main, menu);
return true;
}
@Override
public boolean onOptionsItemSelected(MenuItem item) {
// Handle action bar item clicks here. The action bar will
// automatically handle clicks on the Home/Up button, so long
// as you specify a parent activity in AndroidManifest.xml.
int id = item.getItemId();
if (id == R.id.action_settings) {
return true;
}
return super.onOptionsItemSelected(item);
}
// Method to start the service
public void startService(View view) {
startService(new Intent(getBaseContext(), MyService.class));
}
// Method to stop the service
public void stopService(View view) {
stopService(new Intent(getBaseContext(), MyService.class));
}
}
package com.example.backgroundprocess;
import android.app.Service;
import android.content.Intent;
import android.os.IBinder;
import android.widget.Toast;
public class MyService extends Service {
@Override
public IBinder onBind(Intent arg0) {
return null;
}
@Override
public int onStartCommand(Intent intent, int flags, int startId) {
// Let it continue running until it is stopped.
Toast.makeText(this, "Service Started", Toast.LENGTH_LONG).show();
return START_STICKY;
}
@Override
public void onDestroy() {
super.onDestroy();
Toast.makeText(this, "Service Destroyed", Toast.LENGTH_LONG).show();
}
}
Now We Have To Call This Service To Start.In Order To Do That We Have To Add Few Code Lines To 'MainActivity.java'.
package com.example.backgroundprocess;
import android.support.v7.app.ActionBarActivity;
import android.support.v7.app.ActionBar;
import android.support.v4.app.Fragment;
import android.content.Intent;
import android.os.Bundle;
import android.view.LayoutInflater;
import android.view.Menu;
import android.view.MenuItem;
import android.view.View;
import android.view.ViewGroup;
import android.os.Build;
public class MainActivity extends ActionBarActivity {
@Override
protected void onCreate(Bundle savedInstanceState) {
super.onCreate(savedInstanceState);
setContentView(R.layout.activity_main);
}
@Override
public boolean onCreateOptionsMenu(Menu menu) {
// Inflate the menu; this adds items to the action bar if it is present.
getMenuInflater().inflate(R.menu.main, menu);
return true;
}
@Override
public boolean onOptionsItemSelected(MenuItem item) {
// Handle action bar item clicks here. The action bar will
// automatically handle clicks on the Home/Up button, so long
// as you specify a parent activity in AndroidManifest.xml.
int id = item.getItemId();
if (id == R.id.action_settings) {
return true;
}
return super.onOptionsItemSelected(item);
}
// Method to start the service
public void startService(View view) {
startService(new Intent(getBaseContext(), MyService.class));
}
// Method to stop the service
public void stopService(View view) {
stopService(new Intent(getBaseContext(), MyService.class));
}
}
Change Manifest To Identify The Service.Add Following Code In AndroidManifest File In Between "</activity>" & "</application>" Tags As Follows.
<?xml version="1.0" encoding="utf-8"?>
<manifest xmlns:android="http://schemas.android.com/apk/res/android"
package="com.example.backgroundprocess"
android:versionCode="1"
android:versionName="1.0" >
<uses-sdk
android:minSdkVersion="9"
android:targetSdkVersion="9" />
<application
android:allowBackup="true"
android:icon="@drawable/ic_launcher"
android:label="@string/app_name"
android:theme="@style/AppTheme" >
<activity
android:name="com.example.backgroundprocess.MainActivity"
android:label="@string/app_name" >
<intent-filter>
<action android:name="android.intent.action.MAIN" />
<category android:name="android.intent.category.LAUNCHER" />
</intent-filter>
</activity>
<service android:name=".MyService" />
</application>
</manifest>
Now We Have Completed Our Coding Parts.Now Run The Application & See.After Clicking 'Start Service' You Will Get The Out Put As Below.
Now Press The 'Stop Service' Button.You Will Get The Following Output.
Now You Can Use This Is Simple Application As A Component To Your Application.
For Your Knowledge : You Can Start A Services Many Time Without Even Stopping It.But You Can Only Stop A Service If Their Is A Running Service Only.
Android Hello World
Before Getting Into Android Development First You Must Setup The Environment For Android Development.Following Software Components Needed.
1. Java Development Kit (JDK)
2. Get The ADT Bundle Download
Extract ADT Bundle and Click Eclipse. It Will Open The Eclipse and Ask For A Work Space.

Work Space is The Folder Where Your Project File Is Gonna Stored.You Can Select Any Folder As You Wish and You Can Change Your Work Space Anytime.In My Example I've Created A Folder Called Test In My D Drive I Selected That As My Work Space.After The Work Space Selection It Will Open The Eclipse Main Window For You.
To Create A New Android Project Go To File --> New --> Android Application Project
Then It Will Open A Window Like Below.

Now Specify Relevant Information In That Window.Application Name The Name Of The Application That Your Going To Create.In My Case I'm Going To Give As 'Hello World'.Then It Will Automatically Fill The Project Name and Package Name.
In The Minimum Required SDK Field We Have To Specify The Minimum Requirement To Run This Application In Android Based Mobile.In My Case I'm Selecting API Level 9.In The Target SDK Field We Have To Specify The SDK Level In The Android Mobile.In The Compile With Field You Have To Select The API Level That You Have.In My Case I Only Have The API Level 19 Latest At The Moment.Finally It Will Apear Like Below.

Then Click The 'Next' Button.It Will Open Another Window.

Click The 'Next' Button Again.Then It Will Open Another Window.

Click The 'Next' Button Again.Then It Will Open Another Window.

Click The 'Next' Button Again.Then It Will Open Another Window.

Finally Click The 'Finish' Button.Then It Will Open The Application Window.

To Test Our Application We Need Virtual Android Device, Or Else You Can Connect Your Android Mobile Phone Too.To Create A New Virtual Android Device Go To Window --> Android Virtual Device Manager.Then It Will Open A Window Like Below.

To Create A New Android Virtual Device Click The 'New' Button In The Right Corner.Then It Will Open Another Window Like Below.

Enter The Following Details To Create A New Device.

Then Click 'OK' Button.You Will End Up The Window Like Below.

Then Select The AVD Name and Click The 'Start' Button.

Now It Will Ask To Launch The Virtual Device.Click The 'Launch' Button.

It Will Start You A Virtual device Now.

Now To Test Our Application Follow The Below Steps.


Now Double Click The Android Application In The Right Side.

Browse The Project By Clicking the 'Browse' Button.

Now Press 'OK' Button.Click The 'Target Tab' To Select The Target Device.

Click The 'AVD Name Check Box' True and Click The 'Apply' Button.Then Click The 'Run' Button.This Only In First Time Configuration.In Next Time You can Do The Following Steps.

Now You Will See The Your Application Is Running In The Device.

If You Go To Application Window You Will See Our New Application Hello World Installed.

Now You May Got A Basic Knowledge About Android Application Development. Start Develop New Applications.
1. Java Development Kit (JDK)
2. Get The ADT Bundle Download
Extract ADT Bundle and Click Eclipse. It Will Open The Eclipse and Ask For A Work Space.
Work Space is The Folder Where Your Project File Is Gonna Stored.You Can Select Any Folder As You Wish and You Can Change Your Work Space Anytime.In My Example I've Created A Folder Called Test In My D Drive I Selected That As My Work Space.After The Work Space Selection It Will Open The Eclipse Main Window For You.
To Create A New Android Project Go To File --> New --> Android Application Project
Then It Will Open A Window Like Below.
Now Specify Relevant Information In That Window.Application Name The Name Of The Application That Your Going To Create.In My Case I'm Going To Give As 'Hello World'.Then It Will Automatically Fill The Project Name and Package Name.
In The Minimum Required SDK Field We Have To Specify The Minimum Requirement To Run This Application In Android Based Mobile.In My Case I'm Selecting API Level 9.In The Target SDK Field We Have To Specify The SDK Level In The Android Mobile.In The Compile With Field You Have To Select The API Level That You Have.In My Case I Only Have The API Level 19 Latest At The Moment.Finally It Will Apear Like Below.
Then Click The 'Next' Button.It Will Open Another Window.
Click The 'Next' Button Again.Then It Will Open Another Window.
Click The 'Next' Button Again.Then It Will Open Another Window.
Click The 'Next' Button Again.Then It Will Open Another Window.
Finally Click The 'Finish' Button.Then It Will Open The Application Window.
To Test Our Application We Need Virtual Android Device, Or Else You Can Connect Your Android Mobile Phone Too.To Create A New Virtual Android Device Go To Window --> Android Virtual Device Manager.Then It Will Open A Window Like Below.
To Create A New Android Virtual Device Click The 'New' Button In The Right Corner.Then It Will Open Another Window Like Below.
Enter The Following Details To Create A New Device.
Then Click 'OK' Button.You Will End Up The Window Like Below.
Then Select The AVD Name and Click The 'Start' Button.
Now It Will Ask To Launch The Virtual Device.Click The 'Launch' Button.
It Will Start You A Virtual device Now.
Now To Test Our Application Follow The Below Steps.
Now Double Click The Android Application In The Right Side.
Browse The Project By Clicking the 'Browse' Button.
Now Press 'OK' Button.Click The 'Target Tab' To Select The Target Device.
Click The 'AVD Name Check Box' True and Click The 'Apply' Button.Then Click The 'Run' Button.This Only In First Time Configuration.In Next Time You can Do The Following Steps.
Now You Will See The Your Application Is Running In The Device.
If You Go To Application Window You Will See Our New Application Hello World Installed.
Now You May Got A Basic Knowledge About Android Application Development. Start Develop New Applications.
Subscribe to:
Posts (Atom)
JWT Token Decode Using Jquery
When it come to authentication we use many mechanism. Ones the user authenticated we must keep these details somewhere safe. So we can share...

-
 In this blog post Ill explain you the logic behind the Sri Lankan National Identity Card (NIC). Sri Lanka now has Old NIC No Format as well ...
 -
In This Article I Will Demonstrate You To Create A Simple Chat Program Using Java Remote Method Invocation(RMI). Following Program Supports ...
-
 In a windows form application sometimes you may want to import a excel file to a data grid view. In this blog post Ill demonstrate to you gu...