Sep 28, 2016

[Fixed Solution] Show A Message When Mouse Hovers Over A Button In Windows Forms Application

In a windows forms application, sometimes you may wanted to show a mouse hover text on it, just like in web application. The easy way to do it is using a tool tip. 

In this blog post I'm going to show you a easy way of doing it. With just two lines of C# codes.  Simply you can do this using a MouseHover event. To do that click your button in designer mode and go to events in properties window. Now find the MouseHover event and double click in that. You will get the mouse hover event code. Simply use the below codes to show the text.


1
2
3
4
5
public void btnTest_MouseHover(object sender, EventArgs e)
{
 System.Windows.Forms.ToolTip toolTip = new System.Windows.Forms.ToolTip();
 toolTip.SetToolTip(btnTest, "This is a test text");
}

Sep 26, 2016

Disable All Tabs In JEasy UI [Solved]

Question 
I am using jeasy ui Tabs. Link To Jeasy Ui Tabs
Is there a way to disable all tabs at once. ??
Currently i am able to disable one by one only.
$('#tab').tabs('disableTab', 1);    
$('#tab').tabs('disableTab', 2);
Answer 
once soulation :
$('#tab').tabs('tabs').forEach(function(v,i){
     var opts=$('#tab').tabs("getTab",i).panel("options");
     opts.tab.addClass("tabs-disabled");
     opts.disabled=true;      
});
other soulation :
$('#tab').tabs('tabs').forEach(function(v,i){
  var opts=$('#tab').tabs("disableTab",i);
});

Mar 18, 2016

Google Maps Creating Polygon And Retrieving Coordinates

In this article I'm going to explain you about getting the latitude and longitude of a polygon in order to do a google map polygon search. In-order to do that first you should let the user to draw a polygon. Then you should get the latitude and longitude of the corners of the polygon. After getting the latitude and longitude of the area drawn by user, what you have to do is, search it in the database or what ever you want. It's completely up to you.

In this example I'm not telling you guys about the polygon search. I'm just trying to help you in the first step by giving the latitude and longitude array of the drawn area.Following example will help you to develop your own google map.Then you can draw a Polygon area on it.

 1
 2
 3
 4
 5
 6
 7
 8
 9
10
11
12
13
14
15
16
17
18
19
20
21
22
23
24
25
26
27
28
29
30
31
32
33
34
35
36
37
38
39
40
41
42
43
44
45
46
47
48
49
50
51
52
53
54
55
56
57
58
59
<html>
<head>
    <title>Google Maps Creating Polygon And Retrieving Coordinates</title>
    <script type="text/javascript" src='https://maps.googleapis.com/maps/api/js?v=3.exp&sensor=false'></script>
    <style>
        #map-canvas
        {
            width: auto;
            height: 500px;
        }
    </style>
</head>
<body onload="initialize()">
    <div id="map-canvas"></div>
    <div id="result"></div>
    <script type="text/javascript">
        function initialize() {
            var myLatLng = new google.maps.LatLng(6.92814, 79.9124);
            var mapOptions = {
                zoom: 12,
                center: myLatLng
            };
            var map = new google.maps.Map(document.getElementById('map-canvas'), mapOptions);

            var triangleCoords = [
                new google.maps.LatLng(6.92814, 79.9124),
                new google.maps.LatLng(6.89746, 79.87636),
                new google.maps.LatLng(6.88553, 79.93644)
            ];

            myPolygon = new google.maps.Polygon({
                paths: triangleCoords,
                draggable: true,
                editable: true,
                strokeColor: '#FF0000',
                strokeOpacity: 0.8,
                strokeWeight: 2,
                fillColor: '#FF0000',
                fillOpacity: 0.35
            });

            myPolygon.setMap(map);

            google.maps.event.addListener(myPolygon.getPath(), "insert_at", getPolygonCoords);

            google.maps.event.addListener(myPolygon.getPath(), "set_at", getPolygonCoords);
        }

        function getPolygonCoords() {
            var len = myPolygon.getPath().getLength();
            var htmlStr = "";
            for (var i = 0; i < len; i++) {
                htmlStr += "<p>" + myPolygon.getPath().getAt(i).toUrlValue(5) + "</p>";
            }
            document.getElementById('result').innerHTML = htmlStr;
        }
    </script>
</body>
</html>


Then you can get the coordinates in the selected area. Above example I have draw a triangle so, Ill will get three coordinates. Actually what Google Map returning is the Latitude and Longitude of the corners.


1
myPolygon.getPath().getAt(i).toUrlValue(5);

Above code line returns the Latitude and Longitude of a corner. But if your trying to get a lat-lng object out of it, you cant do it directly. because above methods returns the lat lng as a string. But new google.maps.LatLng(lat,lng) expects two numbers separated with commas. So to do that's follow below lines of codes.

 1
 2
 3
 4
 5
 6
 7
 8
 9
10
function getPolygonCoords() {
    var len = myPolygon.getPath().getLength();
    points = [];
    for (var i = 0; i < len; i++) {
        var strLatLng = myPolygon.getPath().getAt(i).toUrlValue(5);
        var arrLatLng = strLatLng.split(",");
        var objLatLng = new google.maps.LatLng(Number(zzz[0]), Number(zzz[1]));
        points.push(objLatLng);
    }
}

Hope you found this article useful.

Check My Other Articles About Google Maps.

1. Creating A Google Map Using Google Map API v3
2. Show Current Location In A Google Map Using Google Map API v3
3. Getting The Address Of Selected Location In Google Map Using Google Map API v3
4. Getting The Selected Latitude And Longitude From Google Map Using Google Map API v3
5. Google Map With Multiple Markers & Info Windows Using Google Map API v3
6. Getting The Direction Between Two Markers In Google Map Using Google MAP API
7. Getting The Direction Between Two Locations Using Google MAP API
8. Getting The Distance Between Two Markers In Google Map Using Google MAP API
9. Getting The Distance Between Two Locations Using Google MAP API
10. Getting The Nearest Places For A Location In Google Map Using Google MAP API
11. Google Map With InfoBubble
12. Google Maps Creating Polygon And Retrieving Coordinates

Mar 7, 2016

Google Map With InfoBubble

Following example will help you to develop your own google map with infobubble using given latitude & longitude.


 1
 2
 3
 4
 5
 6
 7
 8
 9
10
11
12
13
14
15
16
17
18
19
20
21
22
23
24
25
26
27
28
29
30
31
32
33
34
35
36
37
38
39
<html>
<head>
    <title>Google Map With InfoBubble</title>
    <script src="https://maps.googleapis.com/maps/api/js?sensor=false" type="text/javascript"></script>
    <script src="http://google-maps-utility-library-v3.googlecode.com/svn/trunk/infobubble/src/infobubble.js" type="text/javascript"></script>
</head>
<body>
    <div id="map-canvas" style="width: 100%; height: 500px;">
    </div>
    <script type="text/javascript">
        var lat = 6.929537;  //Your Location Latitude
        var lon = 79.866271; //Your Location Longitude
        var latlng = new google.maps.LatLng(lat, lon);
        var mapOptions = {
            center: latlng,
            zoom: 15
        };
        var map = new google.maps.Map(document.getElementById("map-canvas"), mapOptions);
        var marker = new google.maps.Marker({
            position: latlng,
            map: map
        });

        var infoBubble = new InfoBubble({
            maxWidth: 300,
            content: '<div><h5>Content Header</h5><p>Content Goes Here</p></div>'
        });

        google.maps.event.addListener(marker, 'click', function () {
            infoBubble.open(map, marker);
        });

        google.maps.event.addListener(marker, 'mouseover', function () {
            infoBubble.open(map, marker);
        });

    </script>
</body>
</html>


Check My Other Articles About Google Maps.

1. Creating A Google Map Using Google Map API v3
2. Show Current Location In A Google Map Using Google Map API v3
3. Getting The Address Of Selected Location In Google Map Using Google Map API v3
4. Getting The Selected Latitude And Longitude From Google Map Using Google Map API v3
5. Google Map With Multiple Markers & Info Windows Using Google Map API v3
6. Getting The Direction Between Two Markers In Google Map Using Google MAP API
7. Getting The Direction Between Two Locations Using Google MAP API
8. Getting The Distance Between Two Markers In Google Map Using Google MAP API
9. Getting The Distance Between Two Locations Using Google MAP API
10. Getting The Nearest Places For A Location In Google Map Using Google MAP API
11. Google Map With InfoBubble
12. Google Maps Creating Polygon And Retrieving Coordinates

Feb 27, 2016

Calling AngularJS Function From Outside The Scope

Sometimes you may want to call a function in angular scope from outside the scope. For an example will say you have an AngularJS Controller which contains a function to do something. And you have another button outside the this controller. You can use below method to do it so.

Lets see initially how our controller looks like.

 1
 2
 3
 4
 5
 6
 7
 8
 9
10
11
12
13
14
15
16
17
18
19
20
21
22
<html>
<head>
    <script type="text/javascript" src="https://ajax.googleapis.com/ajax/libs/angularjs/1.4.5/angular.min.js"></script>
</head>
<body ng-app="myApp">
    <div ng-controller="myController">
        <input type="button" value="Say Hello" ng-click="sayHello()"/>
        <br />
        <span>{{name}}</span>
    </div>
    <hr/>
</body>
<script type="text/javascript" >
    var app = angular.module('myApp', []);
    app.controller('myController', function ($scope) {
        $scope.name = '';
        $scope.sayHello = function () {
            $scope.name = 'Nifal Nizar';
        };
    });
</script>
</html>

 Now lets say you wanted to call the "sayHello()" function from outside the controller. First what you should do is get the scope of the controller which contains the method you wanted call to a variable. In order to that first you should have sort of an identification to the controller. Simply you can give id to the container which contains the controller. Then you can simply apply it to the scope. 


 1
 2
 3
 4
 5
 6
 7
 8
 9
10
11
12
13
14
15
16
17
18
19
20
21
22
23
24
25
26
27
28
29
30
31
32
<html>
<head>
    <script type="text/javascript" src="https://ajax.googleapis.com/ajax/libs/angularjs/1.4.5/angular.min.js"></script>
</head>
<body ng-app="myApp">
    <div id="mySec" ng-controller="myController">
        <input type="button" value="Say Hello" ng-click="sayHello()"/>
        <br />
        <span>{{name}}</span>
    </div>
    <hr>
    <br />
    <input type="button" value="Say Hello From JQuery" onclick="callAngularFunction()">
</body>
<script>
    var app = angular.module('myApp', []);
    app.controller('myController', function ($scope) {
        $scope.name = '';
        $scope.sayHello = function () {
            $scope.name = 'Nifal Nizar';
        };
    });

    function callAngularFunction() {
        var scope = angular.element(document.getElementById("mySec")).scope();
        scope.$apply(function () {
            scope.sayHello();
        });
    }
  
</script>
</html>

Hope you had what you are looking for.


Feb 13, 2016

[Fixed Solution] Check For The Existence Of Option In Select Using JQuery

In this article I'm going to show you all, how to check for <option>'s existence in a <select> tag. Their are many ways to do this. Lets see a simple way of it.

First lets have a look on my drop down. 

1
2
3
4
5
6
7
8
9
<html>
<body>
    <select id="ddMember">
        <option value="Nifal">Nifal</option>
        <option value="Asjad">Asjad</option>
        <option value="Dinesh">Dinesh</option>
    </select>
</body>
</html>

Now lets say you wanted to check for the existence of the member "Gowtham" in the above drop-down. Use below java script codes to check it. 

1
var isExist = $('#ddMember option:contains("Gowtham")').length;

Above code will check for the given option. If value is not exist it will return zero(0). Otherwise it will return some other number, depending on the occurrences. 
Lets say, you wanted check for a option and if not available you wanted add it to your drop-down, simply use your below codes to do it. 

1
2
3
if($('#ddMember option:contains("Gowtham")').length){
  $('#ddMember').append("<option value="Gowtham">Gowtham</option>");
}

Hope you found, what you looked for.


Jan 4, 2016

Using Date Time Pickers In AngularJS

You may have used many Date Pickers using JQuery. In AngulrJS also you can use JQuery way to create Date Pickers. But it's not good way to do it. Because you will dynamically create multiple Date Pickers. So you have to initialize all of the Date Pickers after it's loads to the DOM. Otherwise it won't give you the Date Pickers. In AngularJS, it's slightly  different. In AngularJS, You may have to use a AngularJS Directive to bind it.

Before doing it in AngularJS, lets see how we can do using JQuery. Lets Start With JQuery UI Date Picker. If you don't have the java script files, please download the below files.  

Copy the below codes and view it in a browser. You will get the JQuery UI Date Picker. 


 1
 2
 3
 4
 5
 6
 7
 8
 9
10
11
12
13
14
15
16
<html>
<head>
    <link href="jquery-ui.css" rel="stylesheet" type="text/css" />
    <script type="text/javascript" src="jquery.js"></script>
    <script type="text/javascript" src="jquery-ui.js"></script>
</head>
<body>
    <label>Date</label>
    <input type="text" id="datepicker" />
</body>
<script type="text/javascript" >
    $(document).ready(function () {
        $("#datepicker").datepicker();
    });
</script>
</html>

Now lets do it in AngularJS way. Hope you have basic knowledge of module and all. First of all add the AngularJS file. Then define the "ng-app" in <body> tag.


Now we need to create a directive and add it our app as below.


 1
 2
 3
 4
 5
 6
 7
 8
 9
10
11
12
13
14
15
var app = angular.module('app', []);
app.directive('datepicker', function () {
    return {
        require: 'ngModel',
        link: function (scope, el, attr, ngModel) {
            $(el).datepicker({
                onSelect: function (dateText) {
                    scope.$apply(function () {
                        ngModel.$setViewValue(dateText);
                    });
                }
            });
        }
    };
});

Lets see the full code now.


 1
 2
 3
 4
 5
 6
 7
 8
 9
10
11
12
13
14
15
16
17
18
19
20
21
22
23
24
25
26
27
28
29
<html>
<head>
    <link href="jquery-ui.css" rel="stylesheet" type="text/css"></link>
    <script src="angular.js" type="text/javascript"></script>
    <script src="jquery.js" type="text/javascript"></script>
    <script src="jquery-ui.js" type="text/javascript"></script>
</head>
<body ng-app="app">
    <label>Date</label>
    <input datepicker="" ng-model="mydate" type="text" />
</body>
<script type="text/javascript">
    var app = angular.module('app', []);
    app.directive('datepicker', function () {
        return {
            require: 'ngModel',
            link: function (scope, el, attr, ngModel) {
                $(el).datepicker({
                    onSelect: function (dateText) {
                        scope.$apply(function () {
                            ngModel.$setViewValue(dateText);
                        });
                    }
                });
            }
        };
    });
</script>
</html>

If you run this code in browser, you will get the JQuery-UI Date Picker same as what we got using JQuery.

There are many Date Pickers and Date Time Pickers with different implementations. Above example used JQuery-UI Date Picker. Lets see some of other Date Pickers and Date Time Pickers. I found the following Date Picker and Date Time Picker given by XDSOFT plugin.

Lets see how we can use this plugin in our AngularJS Applications. First of all download the resources from below link.
Lets see how we can implement this in JQuery.


 1
 2
 3
 4
 5
 6
 7
 8
 9
10
11
12
13
14
15
16
17
18
19
20
21
22
23
24
25
26
27
28
29
30
31
32
33
34
35
36
37
<html>
<head>
    <link rel="stylesheet" type="text/css" href="jquery.datetimepicker.css" />
    <script type="text/javascript" src="jquery.js"></script>
    <script type="text/javascript" src="jquery.datetimepicker.full.js"></script>
</head>
<body>
    <h3>DatePicker</h3>
    <input type="text" id="pickerDate" />
    <br /><br />
    
    <h3>DateTimePicker</h3>
    <input type="text" id="datetimepicker" />
    <br /><br />
    
    <h3>TimePicker</h3>
    <input type="text" id="pickerTime" />
</body>
<script type="text/javascript">
    $(document).ready(function () {
        
        $('#pickerDate').datetimepicker({ 
            timepicker:false,
            format:'d/m/Y',  
        });
  
        $('#datetimepicker').datetimepicker({});

        $('#pickerTime').datetimepicker({
            datepicker:false,
            format:'H:i',
            step:15
        });

    });
</script>
</html>

Copy the codes and view it in a browser. You will get the XDSoft Date Pickers. 


Now lets create a directive for the XDSoft Date Pickers.

 1
 2
 3
 4
 5
 6
 7
 8
 9
10
11
12
13
14
15
16
17
18
19
20
21
22
23
24
25
26
27
28
29
30
31
32
33
34
35
36
37
38
39
40
41
42
43
44
45
46
47
48
var app = angular.module('app', []);

app.directive('XDSoftDP_Date', function () {
    return {
        require: 'ngModel',
        link: function (scope, el, attr, ngModel) {
            $(el).datepicker({
  timepicker:false,
                onSelect: function (dateText) {
                    scope.$apply(function () {
                        ngModel.$setViewValue(dateText);
                    });
                }
            });
        }
    };
});

app.directive('XDSoftDP_Time', function () {
    return {
        require: 'ngModel',
        link: function (scope, el, attr, ngModel) {
            $(el).datepicker({
  datepicker:false,
                onSelect: function (dateText) {
                    scope.$apply(function () {
                        ngModel.$setViewValue(dateText);
                    });
                }
            });
        }
    };
});

app.directive('XDSoftDP_DateTime', function () {
    return {
        require: 'ngModel',
 link: function (scope, el, attr, ngModel) {
     $(el).datetimepicker({
  onSelect: function (dateText) {
      scope.$apply(function () { 
                        ngModel.$setViewValue(dateText);
             });
   }
     });
        }
    };
});

Hope you understood how it works. Like this you can add any of options given by the pickers. Simply add those options available in JQuery to AngularJS Directive.


Dec 16, 2015

Quick Start To ASP.NET Web API 2

In this article, I will explain how you can use ASP .NET Web API 2. ASP .NET Web API is a framework which provides by .NET Framework. We can use ASP .NET Web API's to create restful services. ASP .NET Web API released with MVC 4. That's a small description about ASP .NET Web API.

Lets start from the beginning. You can either create an empty web api project or by creating asp .net wep application and then adding web api's to it. That's completely depend on your and project style. Sometimes you may want to add api's to existing project. So in this kind of situation you have to add web api's configurations to it. Anyway to develop asp .net web api it won't be an issue.

Lets learn this is easy way first.First we should know how this works. Then it will be easy to add manually.

Lets Start. 

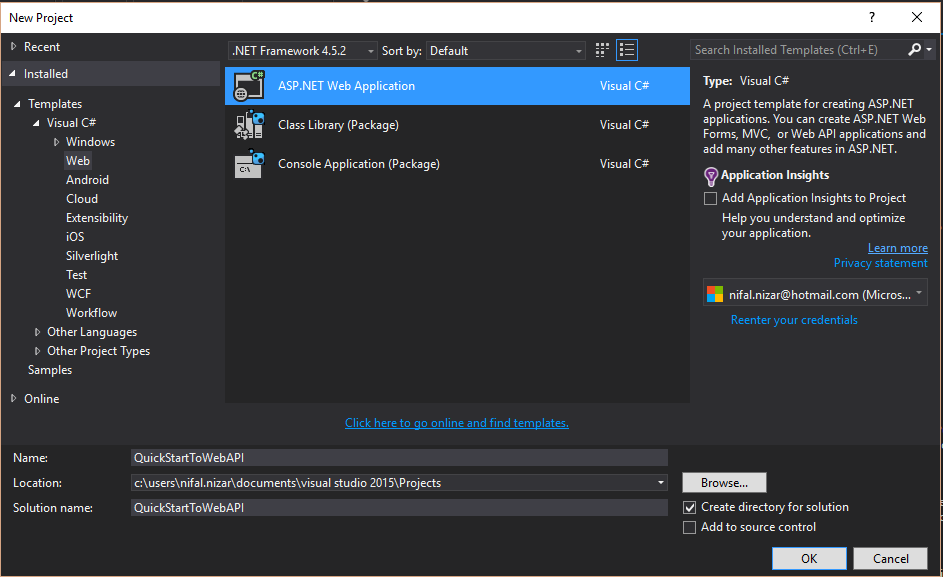
Go To File -> New Project. 


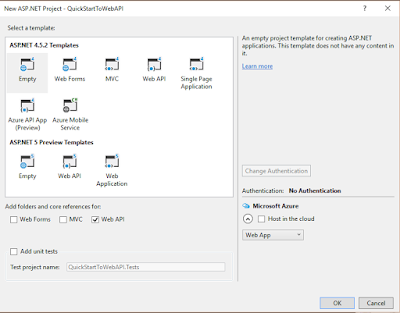
If Empty Web API Project, Then 


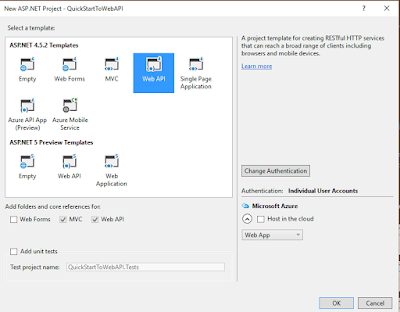
Or Else MVC Web API Project


In My Example I Have Created An Empty Web API Project. My Solution Explorer Looks Like Below.
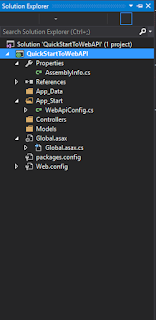


Lets Add A Controller To Our Project. Right Click Controller Folder In Solution Explorer.
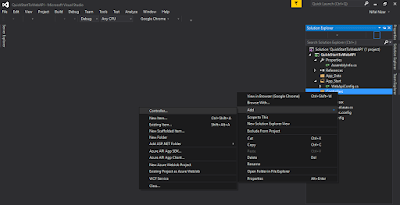


Then You Will Get Window Like Below.
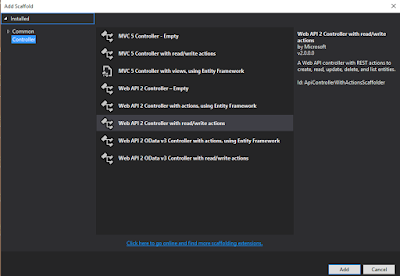


No Need to Go To Deep First. Select "Web API 2 Controller with read/write actions". This Will Give You Necessary Methods. After You Click "Add", It Will Ask You To Give A Name For Your Controller. Give What Ever Name You Want. But Make Sure It;'s Ends With Word "Controller". I'm Giving As "DefaultController", Which Automatically Comes. After Giving A Name To Controller Press "Add". You Will Get Your Controller Just Like Below.


 1
 2
 3
 4
 5
 6
 7
 8
 9
10
11
12
13
14
15
16
17
18
19
20
21
22
23
24
25
26
27
28
29
30
31
32
33
34
35
36
37
38
39
using System;
using System.Collections.Generic;
using System.Linq;
using System.Net;
using System.Net.Http;
using System.Web.Http;

namespace QuickStartToWebAPI.Controllers
{
    public class DefaultController : ApiController
    {
        // GET: api/Default
        public IEnumerable<string> Get()
        {
            return new string[] { "value1", "value2" };
        }

        // GET: api/Default/5
        public string Get(int id)
        {
            return "value";
        }

        // POST: api/Default
        public void Post([FromBody]string value)
        {
        }

        // PUT: api/Default/5
        public void Put(int id, [FromBody]string value)
        {
        }

        // DELETE: api/Default/5
        public void Delete(int id)
        {
        }
    }
}

You Will See By Default, Controller Has Created Five Different Methods. Lets Check Our Web API Is Working Fine. Run The Visual Studio Project. You Will See Your Browser Started A New Tab Like Below.


Don't Worry If Your Getting Something Like This. This Is Because, We Have Not Specify The Web API Yet. Go To Your Browser URL And Call Your Web API Like Below. Just After Your Domain "/api". Then Your Controller Name, But Don't Type The Controller Word Here.

http://localhost:50076/api/Default 

Now If You Run You Will Get The Browser Just Like Below.

 
If You Are Getting This Mean You Are Successfully Calling Your Web API Method. If You Keep Break Pints In All Your Methods In Web API, U=You Will See Its Calling "Get()" Method. In Order To Call The "Get(int id)", Adjust Your URL Like Below. That Means Your Passing A Parameter To Your Web API Controller.

http://localhost:50076/api/Default/2


Hope You Had Good Start With ASP.NET Web API 2. You Can Improve Your Web API By Getting Data From Database. Rather Giving Some Default Values Like Our Example.

Dec 15, 2015

Use Optional Parameters For Methods In C#

In C# You Can Create Methods With Optional Parameters. Which Means, When You Are Calling The Method You Don't Need Pass All The Parameters. If You Want You Can Ignore The Optional Ones. Then Methods Will Take The Defaults Values. Important Thing In Optional Parameter Is, You Have To Give A Default Value To The Optional Parameters.

Lets See How We Can Do This. I Have Create A Simple Console Application. In That Create A Static Method Called "SayHello" Which Takes Two String Parameters As "First Name" And "Last Name".


 1
 2
 3
 4
 5
 6
 7
 8
 9
10
11
12
13
14
15
16
17
18
19
20
21
22
23
using System;
using System.Collections.Generic;
using System.Linq;
using System.Text;
using System.Threading.Tasks;

namespace Optional_Parameter
{
    class Program
    {
        static void Main(string[] args)
        {
            SayHello("Nifal", "Nizar");
            Console.ReadLine();
        }

        static void SayHello(string firstName, string lastName)
        {
            Console.WriteLine("Hello {0} {1}", firstName, lastName);
        }

    }
}

If You Run This You Will Get The Output In The Console As Below.

Hello Nifal Nizar

Lets Make The "Last Name" Parameter Optional. Simply In The Method Give A Default Value To The "Last Name" Parameter. In My Case I'm Giving Empty String To It. Lets See The Code.


 1
 2
 3
 4
 5
 6
 7
 8
 9
10
11
12
13
14
15
16
17
18
19
20
21
22
23
using System;
using System.Collections.Generic;
using System.Linq;
using System.Text;
using System.Threading.Tasks;

namespace Optional_Parameter
{
    class Program
    {
        static void Main(string[] args)
        {
            SayHello("Nifal");
            Console.ReadLine();
        }

        static void SayHello(string firstName, string lastName = "")
        {
            Console.WriteLine("Hello {0} {1}", firstName, lastName);
        }

    }
}

Now Run And See The Output.

Hello Nifal

Same Like This You Can Make More Optional Parameters. Hope You Got The Knowledge Of Optional Parameter.


JWT Token Decode Using Jquery

When it come to authentication we use many mechanism. Ones the user authenticated we must keep these details somewhere safe. So we can share...